 TRIBSPACK
3.0
User
Guide
Use of the software
Prompting in Arc the TRIBSPACK.aml script, suddenly the menu-driven
program is launched. (Figure 1)

Figure 1 - Main program window.
TRIBSPACK_3.0 - Simulation Options
Clicking on the CONTINUE button, the user will be diverted
into the starting procedure. The second window that will appear will be the
OPTIONS SIMULATION windows on which, the simulation options could be
chosen (e.g. run flags). By default, all the options are set on ON,
but simply by clicking on the OFF button each variable could be unselected
(Figure 2). For the meaning of the simulation options, see the tRIBSUserManual.
After the options have been set, the user, by clicking on SELECT button,
will be directed to the SIMULATION CHOICES window.

Figure 2 - Options window.
TRIBSPACK_3.0 - Simulation Choices
This menu window provides the user the opportunity to choose
between a single simulation (SINGLE SIMULATION) or a set of simulations
(MULTI SIMULATION). In this second case, the user can set up the input
file, output folder and output file management (conversion and joining) for
each simulation at a single time. All of the simulations will be execute consecutively
without waiting for the end of each simulation to run the next one. (Figure
3)

Figure 3 - Simulation choices window. Standard case.
TRIBSPACK_3.0 - Simulation Choices
- SINGLE SIMULATION
Clicking on the SINGLE SIMULATION button the SINGLE
SIMULATION menu window will appear as shown in Figure 4.
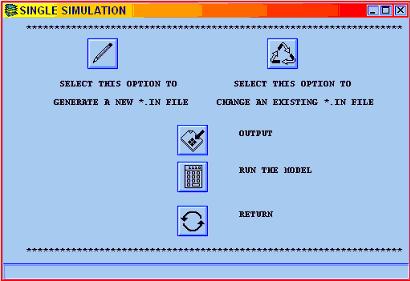
Figure 4 - SINGLE SIMULATION window.
In this window, the user will be guided through the simulation
setting process. This process consists in a step-by-step procedure to generate
the input file, the output option and eventually the simulation execution.
Using the standard sequence, the input file will be created first. The user
can decide to generate a new input file from scratch, insert one by one all
the parameters and variables, or change an existing input file. Selecting,
for example, the existing option, clicking on the button , the user will open
the window where the existing *.in file name will be required. Inserting the
name of the selected file to change, without extension (.in), the next step
will be to click on the GO TO FILE TO CHANGE button.(Figure 5)
With this button clicked, the rewritefile.aml file will be launched. In this
script the inserted file will be read, variable by variable, and the relative
value will be stored in the memory system.
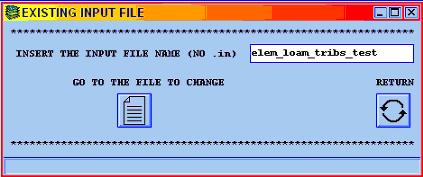
Figure 5 - Inserting the existing input file name.
After this operation, the CHECKING EXISTING FILE popup
window will be opened. In this window, the user will be introduced to the
modification process.
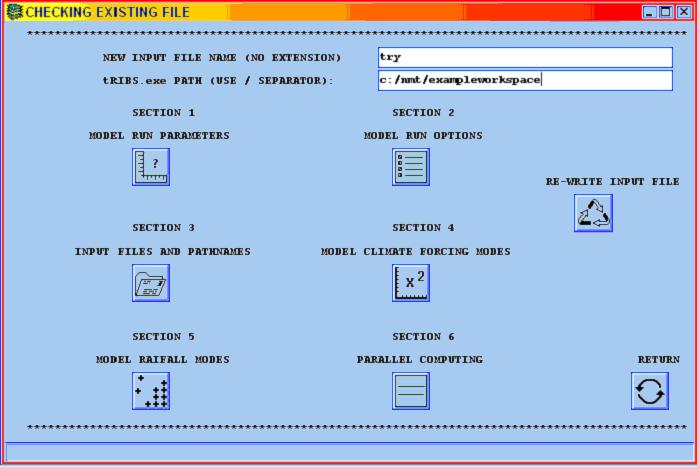
Figure 6- CHECKING EXISTING FILE window structure.
In this step, all the sections are presented on the screen. The first step
to follow is inserting the new *.in file name (without .in extension). The
next step is indicating the tRIBS executable location pathname (Figure
6).
Note: this step provides the creation of the RUN file for the
simulation in CYGWIN and so the separator must be / instead \, because LINUX
emulator doesn't support the first type.
In case the user would to recheck the parameters value, the
process can be repeated by clicking the RE-WRITE INPUT FILE button.
This launches the inputfile.aml script importing all the variable values previously
set. It reads from the formatfile.in stored in the TRIBSPACK_3.0/INPUT folder
and when it finds the keywords variable (e.g. STARTDATE), the related variable
name is associated (e.g. time) and the value assigned. After each line has
been read, an identical line has been written in the output *.in file inserted
before. The .in file created is a file generated in DOS platform and it has
to be formatted in LINUX coding file to be read by tRIBS. In order to do so,
after the writing process the program submits the file to the Cygwin drive
system and with the command dos2unix *.in the file is converted by
DOS to UNIX format.
After that, the program returns in Arc for the next step. Clicking
on the RETURN button the system comes back to the SINGLE SIMULATION
window.
The next steps concern the output options. Clicking on the OUTPUT
button , the window in Figure 13 will be opened. This is the last step before
the simulation can be launched.

Figure 7 - Output options window.
In this section, the user has to insert the output coverage
name. The output coverage will be the coverage generate by the *_voi file
output of the tRIBS simulation; this coverage represents the voronoi cell
structure. The dynamic and integrated files are both output files and store
information about the dynamic and integrated parameters for each voronoi cell.
If the user selects the option YES for those files, the program will
convert the dynamic and integrated files into attribute tables and join them
automatically to the voronoi coverage. The program will execute the operation
using the AML script tribsta.aml.
Clicking the RETURN button, the system returns to the SINGLE SIMULATION
for the last step: the model execution or RUN. Clicking on the RUN
MODEL button , the model starts by reading the *_run file and the input
file previously created.
TRIBSPACK_3.0 - Simulation Choices
- SINGLE SIMULATION OUTPUTS CONVERSION - tribsta.aml
After the simulation ends, the tribsta.aml file is copied in
the voronoi output folder and from here is launched. The conversion process
is simple. For the dynamic files, for example, the program reads from the
file header with the names of the variables in the simulation. Recursively,
each variable value for each voronoi cell is read and saved in a temporary
file (e.g. tempZ.txt, Figure 14).

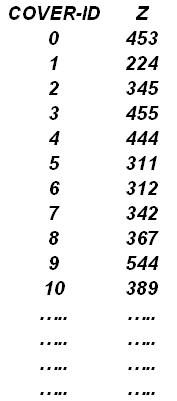
Figure 8 - Creation of the temporary *.txt file to add to the ArcInfo
supported file *.dat with the ADD function and typical form of the temporary
file structure.
Every file contains two columns, one for the ID identification and the other
for the related variable value. Calling the ARC INFO prompt, another temporary
file is created with the DEFINE command: with this command the system
generates a file supported by ArcInfo, in which each features introduced has
to be defined for name, input width, output width, format and decimal places.
With the successive ADD command, the program adds the information from
the *.txt file previously created to the new one (e.g. tempZ.dat, Figure 15).
After this operation, the system goes out from the INFO prompt and executes
the JOINITEM command. This command provides the capability to change
the attribute table (PAT) of a coverage using a supported temporary file.
The process goes on for each variable read in the dynamic file and for every
dynamic file and integrated file stored in the voronoi folder. For more details,
see the ArcInfo guide about the DEFINE, ADD, JOINITEM
command. See the tribsta.aml file for process information and explanation.

Figure 9 - JOINITEM function to modify the PAT of the
output voronoi cells coverage.
When the conversion is terminated, the system returns to the
simulation interface and is ready for a new simulation or to exit the program
(EXIT button).
TRIBSPACK_3.0 - Other simulation
options
Continued
Simulation (-O option)
Multiple
Simulation
 TRIBSPACK
3.0


